

Experimenting with the P-Switch:
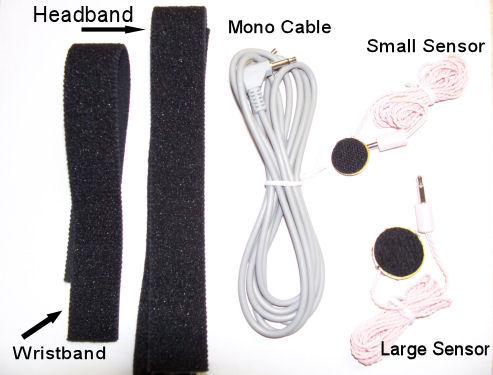
1. Plug the sensor into the Sensor Cable Jack on the P-Switch. Two are provided: one large and one small. They both function the same, although the large sensor, having more surface area, may prove to be more sensitive to movement.
2. Mount the sensor to your forehead by using the headband.
3. Set the Tone/Quiet toggle switch to TONE
4. Adjust the Sensitivity Knob so that moving the forehead activates the switch.
Attaching the Sensor:
There are 2 straps included with your P-Switch. One short and one longer strap. The longer strap can be used as a headband and the shorter strap as a wrist band. On the back of the sensor is a piece of velcro that will attach to the strap. (Sensors have 3.5 mm phono jacks.)
If using the headband and the wrist strap, attach the sensor to the inside of the strap and attach the strap to the body where the sensor will be activated, tucking the sensor wire under the strap so the motion of the wire does not wiggle or pull on the sensor. The strap should be attached snug but not tight Now, check to see if the sensor will activate. If not, you may need to adjust the location of the strap or turn up the Sensitivity Knob on the Control Box.
Parts of the Control Box:
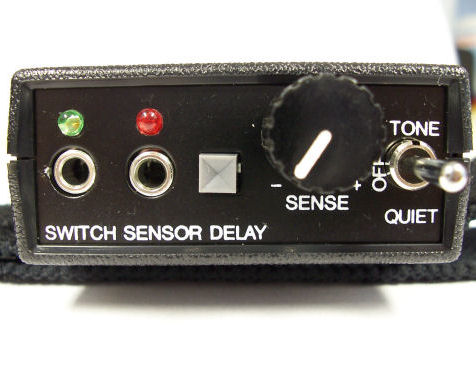
Switch Cable Jack: One end of the Switch Cable is plugged into the Control Box and the other is plugged into a device.
Sensor Cable Jack: Plug in either the small or large sensor into this Sensor jack.
Activation LED: This green LED is lit when the switch going to the control device is closed/activated. When movement is detected, a switch inside the Control Box is closed, sending a signal out the switch cable and to the device.
Delay Button: When set to the OUT position, the activation time is around a quarter of a second. When this button is pushed IN, the delay before the switch can be activated again is between one and two seconds.
Delay LED: The red Delay LED indicates the delay period.
Power/Tone Switch: When set to the Tone position, a tone is heard when the switch is activated. When set to the Quiet position, no tone is heard when the sensor is activated.
Sensitivity Knob: The Sensitivity Knob determines the amount of movement that is needed to activate the switch. Turn the knob counter-clockwise to decrease the sensitivity. Turn the Knob clockwise to increase the sensitivity.
Maintaining the P-Switch:
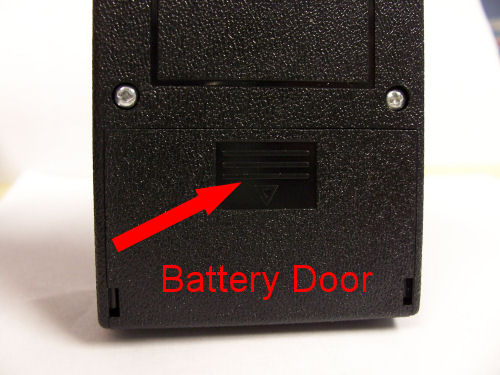
Battery: The P-Switch uses a standard 9 volt battery. To replace the battery, turn the box over and slide the battery door off. Gently remove the battery connector on the old battery and attach to the new battery. Make sure the piece of foam beneath the battery stays in place to keep the battery from moving around.
Sensors: The sensors are quite sturdy with normal use. Avoid stepping on the sensors, bending the wires, and setting heavy objects on them. Misuse will crack the sensor and reduce the sensitivity of them.
Cables: Avoid placing the cables where they can be caught in mechanical devices such as a wheelchair tire, hospital bed or door knobs.
Power: When the P-Switch is not used for long periods of time, the switch should be turned OFF. The switch does draw a very small amount of power when not activated, meaning the switch can be left on for short periods of time.
Troubleshooting the P-Switch:
Problem: Control Box does not respond to the sensors or when a movement is made, the activation LED is not lit.
Try: Battery may be dead. Replace with a standard 9 volt battery.
Power/Tone switch may be set to OFF. Slide the switch in either direction to turn ON.
Cables are not plugged in tightly in the Sensor Jack or the Switch Jacks. Verify a tight connection.
Sensor may be broken. Try the other sensor.
Problem: P-Switch can be activated but needs a very pronounced movement.
Try: Adjusting the sensitivity knob
Replacing the battery
Try a different sensor. This one may be cracked.
Verify that the sensor is plugged in tightly into the jack.
Problem: Switch is too easily activated.
Try: Adjust the Sensitivity
Replace the battery.
NOTE: Although the P-Switch is no longer available and often is not repairable by PRC, an alternative may be found by AMDi called the Piezo Switch.
Was this article helpful?
Available from 8 am - 4 pm ET, Monday - Friday